AWS Command Line Interface (AWS CLI) is a crucial tool for developers, system administrators, and DevOps engineers. With AWS CLI, we can manage AWS services and resources straight from terminal. It helps automate tasks and boost productivity. Whether we are new to AWS or an experienced user, knowing “how to install and configure AWS CLI” is good to automate things in AWS.
In this article, we will explore:
- How to Install and Configure AWS CLI Step-by-Step
- What AWS CLI is and why we need it
- Prerequisites for installation
- How to install AWS CLI on Windows, macOS, and Linux
- Some useful tips and troubleshooting advice
What is AWS CLI and Why Should we use It?
The AWS Command Line Interface (CLI) is a tool that allows you to interact with AWS services using commands in your terminal or command prompt. Instead of using the AWS Management Console, you can script, automate, and manage AWS resources with simple commands.
Advantages of AWS CLI:
- Easily script repetitive automation tasks.
- Manage resources faster than using the web console.
- Maintain uniform processes consistency across environments.
- Easily integrates embed commands in CI/CD pipelines.
Prerequisites:
Before installing AWS CLI, ensure you have following things handy
- An AWS account
- Access to your AWS Access Key ID and Secret Access Key
- Administrator privileges on your machine
How to Install AWS CLI (instructions for each operating system)
AWS CLI (version 2) is the latest version, with improved performance and latest capabilities
- Installing AWS CLI on Windows using MSI Installer (Recommended)
- Go to AWS CLI MSI Installer page , download the 64-bit or 32-bit installer based on your system requirement. Run the installer
- Verify installation – Open Command Prompt and run following command
aws --version
You should see output similar to this screenshot

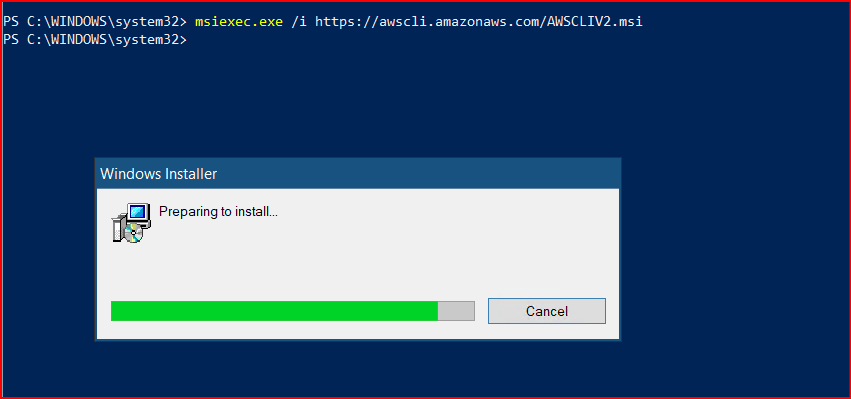
Install using PowerShell (Alternative Method)
- Open PowerShell as Administrator.
- Run the following command .
msiexec.exe /i https://awscli.amazonaws.com/AWSCLIV2.msi
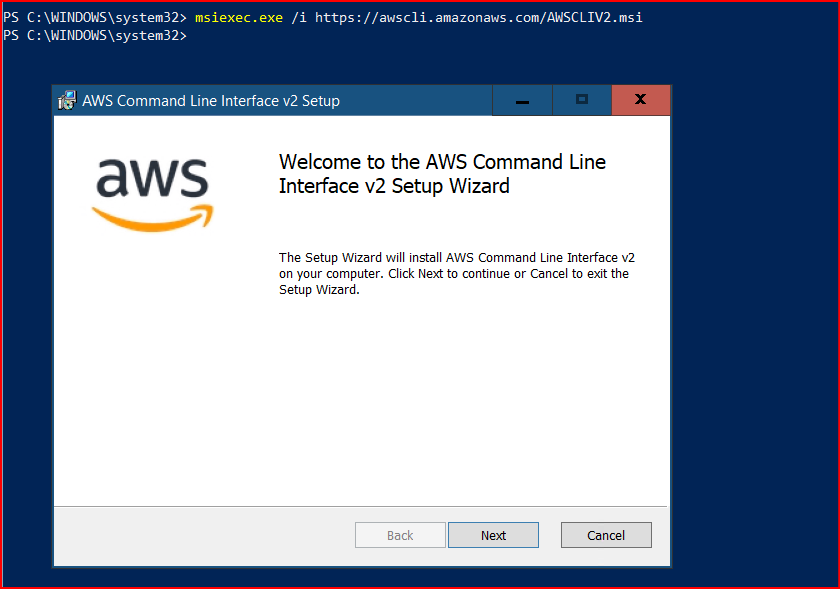
Once installed, verify as above
2. Installing AWS CLI on macOS using the Bundled Installer
- Download the installer
curl "https://awscli.amazonaws.com/AWSCLIV2.pkg" -o "AWSCLIV2.pkg"
- Download the installer
- Run the installer
sudo installer -pkg AWSCLIV2.pkg -target /
- Run the installer
- Verify installation
aws --version
- Verify installation
Output should show the AWS CLI version.
3. Installing AWS CLI on Linux
A. Using the Official Bundled Installer
- Download the installer
curl "https://awscli.amazonaws.com/awscli-exe-linux-x86_64.zip" -o "awscliv2.zip"
- Unzip the installer
unzip awscliv2.zip
- Run the install script
sudo ./aws/install
- Verify installation
aws --version
B. Using a Package Manager (Alternative)
- Some distributions provide awscli in their package repositories, but this may be version 1. For the latest features, always prefer the bundled installer above.
How to Configure AWS CLI
To configure AWS CLI from scratch, we need programmatic access to communicate with AWS outside of the AWS Management Console.
To configure AWS CLI – login to AWS Management Console > access IAM and create a new user . (example: in my case user name is ; ‘developer’)


Set permissions by selecting “ADD User to GROUP” (example: i have already one “User Group” name “Admin” created with administrator access policy) , you can create from there itself

Add user to group by selecting group name which you have created for this, review and create.


Now click on new user (developer) and create access key > select command line interface > create.


By following above steps you will get “Access Key and “Secrete Access Key” , Keep these keys very securely and safely , it would very hard to retrieve secrete key if you loose.

- Now go to CLI and run the configuration command
aws configure
- Enter your AWS credentials and preferences when prompted
AWS Access Key ID: (e.g., AKIAIOSFODNN7EXAMPLE)
AWS Secret Access Key: (e.g., wJalrXUtnFEMI/K7MDENG/bPxRfiCYEXAMPLEKEY)
Default region name: (e.g., us-east-1, eu-west-1)
Default output format: (json, yaml, text, or table)
Example :
Verify your configuration
Run a simple AWS CLI command to verify.

If everything is configured correctly, you’ll see a list of your S3 buckets (if you have any)
Where Does AWS CLI Store Credentials?
Configuration files are saved in your home directory under ~/.aws/:
~/.aws/credentials: Stores AWS access keys.
~/.aws/config: Stores region and output format.
You can manually edit these files for advanced configuration or multiple profiles.
Advanced Configuration Using Named Profiles.
If you manage multiple AWS accounts, use named profiles.
Add a new profile
aws configure –profile myprofileUse the profile with CLI commands
aws s3 ls –profile myprofile
Common Issues and Troubleshooting
1.Ensure the installation path is added to your system’s PATH environment variable. If you found aws “command not found” error.
2. Use sudo for installation steps on macOS/Linux if you receive Permission Denied Errors.
3. If you are getting Invalid Credentials. Double-check your Access Key ID and Secret Access Key. Rotate credentials regularly for security.
4. For Proxy or Network Issues. Configure proxy settings if behind a corporate firewall.
AWS CLI Basic Commands to Get Started
- List all S3 buckets:
aws s3 ls
- Describe EC2 instances:
aws ec2 describe-instances
- Check IAM identity:
aws sts get-caller-identity
Conclusion :
Installing and configuring AWS CLI is a straightforward process, it is recommended and powerful tool for managing and automating AWS resources.
By following this article, we are fully equipped to start managing AWS resources directly from the command line.
Explore more relevant posts on vlookuphub