What is Remote Desktop Services (RDS)?
RDS is a features provided by Microsoft in Windows Servers (2016, 2019, 2022) that allows users to access desktops and applications hosted on a central server or set of servers. Instead of running applications locally on their individual computers, users connect remotely to the server, and the server handles the processing and execution. The user’s device essentially acts as a “thin client,” displaying the output from the server and sending keyboard/mouse input back.
For example: Instead of installing Microsoft Word on 100 different computers, install it once on an RDS server, and all 100 users connect to that server to run Word.
Key Benefits of RDS:
Centralized Management: Install, configure, and update applications on a single server (or cluster), dramatically reducing administrative overhead compared to managing individual workstations.
Enhanced Security: Data resides on the server, not on potentially vulnerable end-user devices. This is crucial for protecting sensitive information.
Improved Performance: For users with older or less powerful devices, the processing power of the server provides a smoother experience for demanding applications.
Remote Access & Flexibility: Users can access their desktop or applications from various devices (PCs, laptops, tablets, smartphones) and locations, enabling work-from-anywhere scenarios.
Cost Savings: Can potentially extend the life of older hardware by using them as thin clients. Streamlines software deployment and licensing in some models.
Standardized Environment: Ensures all users are running the same version of an application in a consistent environment.
Core Components and Roles of an RDS Deployment:
RD Session Host (RDSH): This is the primary server role. It hosts the Windows sessions that users connect to. This is where applications are installed and run.
RD Connection Broker (RDCB): It manages user connections to RD Session Hosts. It distributes sessions across multiple RDSH servers (load balancing) and allows users to reconnect to their existing disconnected sessions. Crucial for high availability and scalability.
RD Web Access (RDWA): Responsible to provides a web-based portal where users can access published applications (RemoteApps) and desktops through a web browser. Simplifies access without needing to configure RDP client settings manually.
RD Gateway (RDG): It allows authorized users to connect to RDS resources over the internet using HTTPS (port 443). It acts as a secure tunnel and eliminates the need for a VPN in many cases. Essential for external access.
RD Licensing: It manages the RDS Client Access Licenses (CALs). Users require a CAL (either Per User or Per Device) to connect to an RD Session Host beyond a short grace period. This role needs to be activated and licenses installed.
RD Virtualization Host (RDVH): Used specifically for VDI (Virtual Desktop Infrastructure) deployments, where users get their own dedicated virtual machine desktop, rather than sharing a server session (Session-Based RDS). We’ll focus primarily on the more common Session-Based deployment here, but it’s good to know the distinction.
Prerequisites:
Windows Server 2016/2019/2022 (Standard or Datacenter)
Adequate CPU, RAM, and storage resources on the server(s) to handle the expected number of users and applications. RAM is particularly important for Session Hosts.
Server joined to an Active Directory domain.
Domain user account with Administrator rights.
Proper network connectivity and DNS resolution between servers and clients
RDS CALs Licensing would require to install it later or licensing server should be available and port (445 & 135) between RDS server and licensing server should be allowed
At least 2 servers recommended for production (1 for RD broker + Web access, 1 for RD session host).
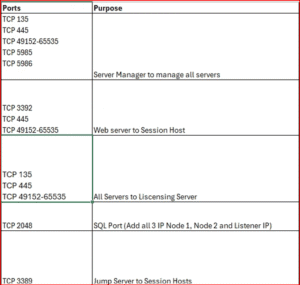
Standard Ports requirement for RDS setup.
RDS Roles Overview in short
| Role | Description |
|---|---|
| RD Session Host- | Hosts Windows-based programs or full desktops |
| RD Connection Broker- | Manages user sessions and load balancing |
| RD Web Access- | Allows access to desktops/apps via a web browser |
| RD Licensing- | Manages RDS CALs (Client Access Licenses) |
| RD Gateway (optional)- | Secures RDP connections over the internet |

Standard RDS deployment architectures
Remote Desktop Services has two standard architectures:
Basic deployment – This contains the minimum number of servers to create a fully effective RDS environment.
Highly available deployment – This contains all necessary components to have the highest guaranteed uptime for your RDS environment.


Step 1: Add RDS Role via Server Manager
- Log in to your Windows Server with admin rights.
- Open Server Manager.
- Click “Manage” > “Add Roles and Features”.
 4. Select “Remote Desktop Services installation”.
 6. Select Session-based desktop deployment.

Choose the servers from list to install below roles: in my case i have installed all roles in single server.
- RD Connection Broker
- RD Web Access
- RD Session Host


Note: The screenshot has taken from single server RDS setup deployment.
Step 2: Confirm and Install Roles
- Confirm your selections.
- Click Deploy.
- Let the installer run; it may take a few minutes.
- Restart the server if required.

Step 3: Configure RDS Collections
- In Server Manager, go to Remote Desktop Services > Overview.
- Click “Create Session Collection”.
- Name your collection (e.g., RemoteApps_Users).
- Select RD Session Host server.
- Specify users or groups allowed access (e.g., Domain Users).
- Publish apps or provide full desktop experience.
Step 4: Configure Licensing (RDS CALs)
- Open Server Manager > Remote Desktop Services.
- Click on RD Licensing > Add RD Licensing server.
- Add your Licensing server (can be the same machine).
- Activate the license server: Open RD Licensing Manager. Right-click your server > Activate Server. Follow the wizard using automatic connection method.
Install RDS CALs (per user or per device as needed).
Step 5: Allow Access via Web or RDP
- Access via Web: Open a browser and navigate to:
https://<your-server-name>/RDWeb
Log in with a domain user.
- Access via RDP:
Open Remote Desktop Connection on client PC.
Enter the RD Session Host’s name or IP.
Provide domain credentials.
Optional: Configure SSL Certificate
- In Server Manager > RDS > Deployment Properties.
- Under Certificates, click Select Existing Certificate.
- Bind your public/internal SSL cert to:
- RD Web Access
- RD Gateway (if used)
- RD Connection Broker


If you interested, I can post detailed RDS deployment and configuration in real time scenario with certificates and required ports for communication in Azure environment.
Yes please